by Deborah Wexler
Somebody asked me why I hadn’t written anything about subtitle timing. I said that most information about timing subtitles can be found online in style guides by content creators, distributors and translation agencies. But I thought about it and decided to share my ideas, terms and definitions in Deep Focus to reach those translators who want to look into the fascinating world of audiovisual translation but don’t know where to start learning about timing. This is for them.
When I teach timing, these are some of the concepts I stress the most. I have practiced them since I was subtitling by hand, except for the one about the mouse, of course, which came later, when we moved from pencils and paper to computers. Except for principle 10, if you google the terms in this article, you won’t find them because I use my own lingo (sorry!), but the principles are not new and have been used in the industry for decades, even if some haven’t been defined.
1. Go Mouseless
You may have heard me say, “If your subtitling software doesn’t allow you to drop your mouse, drop your subtitling software.” Going mouseless speeds up subtitling by using keyboard shortcuts instead of the mouse. While most commercial subtitling programs claim you’ll be able to customize shortcuts via their in-program macros, they don’t have all the combinations a professional subtitler needs. For example, not all subtitling programs snap in times and out times to shot changes. So regardless of the program you are using, you will need to create personalized shortcuts.
I believe one of the best investments a professional subtitler can make is a hotkey or macro program. There are some inexpensive ones on the market, and they’ll allow you to increase your productivity considerably.
2. Avoid Chopping
Chopping is timing an in time late (after the audio begins) or timing an out time early (before the audio ends). If you need a mental image, think of a pineapple being trimmed using a machete. When the audio and the subtitles do not sync, it’s noticeable and annoying for the viewer (I’m sure you have experienced this, especially on one of the large streaming services). This technical flaw makes viewers aware of the subtitles, interrupting their suspension of disbelief so they can no longer enjoy the story.
When I’m training someone, I always say, “Do not chop the audio on the in time.” This is a close second place in the hierarchy of decisions a subtitler will have to make when timing individual subtitles (the first being timing around a shot change).
There are two important considerations regarding chopping: first, in times and out times should at least cover audio from start to finish and, second, shot change timing rules will make it difficult to avoid chopping 100% of the time.
The rules are simple:
- Do not put the in time after the audio starts.
- Do not put the out time before the audio ends.
- In times trump out times in overlapping dialogues.
3. Use the Three-frame Rule
I discovered this principle when I was timing karaoke style songs. With speech at normal speed, the sound of each letter generally lasts approximately three frames. Let’s use the word “dog” as an example. If you play a subtitle and hear “og” instead of “dog,” you just have to move your in time back three frames, and it will land exactly where it belongs.
A great shortcut you can create (and I say this because I have not seen it in any commercial software yet) is this one: “back three frames, add in time, play subtitle.”
If you hear “og,” instead of grabbing the mouse, looking at the soundwave, clicking the in time, pulling it back, etc., use this amazing shortcut and your video will go back three frames, the correct in time will be added, your subtitle will play, and now you’ll hear “dog.”
4. Avoid Cropping
Like in photography, this describes an out time that is timed to the last frame of audio. I advise against this. Instead, I recommend extending it a little and timing the out time one third to one half of a second later. Why? There are two reasons. First, to save yourself time. It’s very difficult to find the last frame of audio while the video is playing. When you realize the dialogue stopped, your finger will take around a third of a second to obey your brain’s command to pause the video. Some subtitling programs can adjust the response time, but most do not. So you will spend a lot of time looking for the last frame of audio in each subtitle you time. Even if you have a soundwave, you will be pausing the video, switching to the mouse and clicking on the soundwave, which is even worse. Second, leaving a bit of time after the end of the last sound alleviates reading speed issues both in transcriptions and translations. As long as you don’t chop the in time of the following subtitle or violate shot change rules, you’ll be golden.
5. Mind the Gap
For this concept, imagine a subway station cautioning the public not to fall into the gap between the platform and the train floor. In subtitling, a gap is the period of time between subtitles. It refers to the moments when there are no subtitles onscreen, and we can enjoy the images in the video. When a subtitle appears at the bottom of the screen, your eyes move down to read the text. When it disappears, your eyes move up to see the images in the video. Your mind won’t spend a microsecond over the bare minimum looking at a subtitle down below. The image will pull your eyes up. When you have a short gap between all your subtitles, your eyes will be ping-ponging during the full movie.
“Minding the gap” means closing small gaps between subtitles. “Mind the gap” is my term, but it’s currently being called chaining or linking. I believe chaining was added to the Netflix guidelines not too long ago, but it has been done for over 50 years in some parts of the industry. There are two main considerations for closing gaps. First, close gaps of 3 to 11 frames (or to 14 frames in a 30-fps video), leaving only 2 frames between subtitles (this is the industry standard). Second, when you have two subtitles with a gap in between, push the out time of the first subtitle forward until you only have 2 frames between them instead of pulling the in time of the second subtitle back to the out time of the first one. This will prevent timing off audio.
A very useful shortcut for this issue is one that pulls the previous out time to two frames before the in time of the active subtitle. It’ll save you a lot of time.
6. Avoid Compression
Compression is an artificial space constraint created by the subtitler. I say artificial because, unlike real time and space constraints, compression is created by bad timing practices. This happens when subtitle timing unnecessarily compresses the space allowed. Or, in layman’s terms, it’s when you unnecessarily reduce the space allowed for text by creating a single subtitle instead of two.
Look at the following subtitle images, each with information about their time and space allowances:
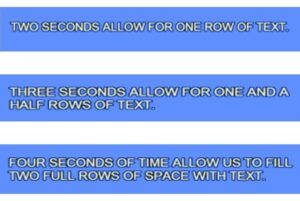
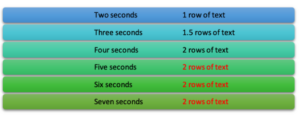
There is certain logic up to this point. As time grows, space grows. But what happens after four seconds? Remember that we can only have two rows of text on screen at a time, which means that the space won’t continue to grow. The space is constrained to two rows after four seconds, so any longer than that will artificially compress what you can type.

This chart shows compression in a nutshell. The space that you have on screen will be unnecessarily compressed if you use a single subtitle for five, six or seven seconds of onscreen time.
So how do you avoid creating an artificial space constraint? Let’s look at our next principle.
7. Use Expansion
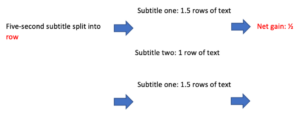
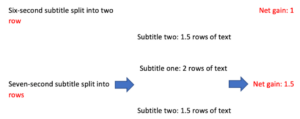
Expansion means avoiding artificial space constraints by splitting a long subtitle. In other words, keeping a single subtitle for up to four seconds of audio and splitting a subtitle that is five, six or seven seconds long. Below, you can see artificially constrained subtitles being split into two subtitles and the net gain of this action. When you are creating English templates or English pivot templates, this will be of the upmost importance, because most languages will need more space than English. With expansion, translators using that template will not be forced to truncate text unnecessarily.
8. Avoid Flashing
To visualize what I mean by this, imagine a strobe light (tik, tik, tik!) that bothers your eyes. Flashing is a group of two or more subtitles with a duration of less than two seconds each. It also describes when text stays onscreen for less than two seconds causing it to “flash” before your eyes.
Flashing is a text segmentation problem and should avoided. To solve it, keep one thought per subtitle. Avoid splitting linguistic units, but try to compress or expand subtitles over four seconds, especially if you are creating templates or pivot templates.
Watching content with flashing will feel like karaoke, with sentences fragmented into many pieces and multiple short subtitles. It’s a bad practice, and now that you know about it, it’s very easy to avoid.
Some strategies are:
- Keep linguistic units together.
- Try to group one sentence per subtitle, but avoid compression.
- Join fragments by combining a subtitle with the previous or the following.
- Extend the out time by up to half a second when possible.
- Shorten 3-to-11-frame gaps between subtitles to 2 frames.
- Avoid the domino effect: creating timing errors in surrounding subtitles while trying to fix your current subtitle.
9. Avoid Omega-alpha Splits
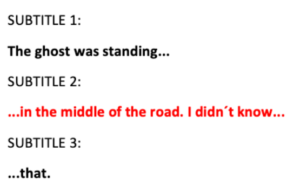
Omega means end and alpha means beginning. Omega-alpha splits are when the end of one sentence and the beginning of another are in the same subtitle. This issue also falls under segmentation problems. In the following example, we have two sentences split into three subtitles. The first red fragment is end of the first sentence. The second red fragment is the beginning of the second sentence. The red text is what I call the omega-alpha split.
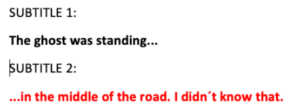
The following is another layout of the same two sentences, this time split into two subtitles. The last fragment of the first sentence and the next sentence are in the same subtitle.
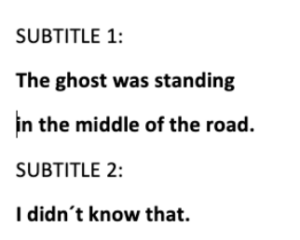
It’s an easy fix now that you know you shouldn’t be doing it: just group the omega with its own linguistic unit and the alpha with its own linguistic unit. A period is a natural place to split your text into rows or into subtitles.
Minimum duration allowed and shot-change rules are among the very few exceptions that will give you no choice but to break this rule.
1. Snap to Shot Changes
There is a lot of literature out there showing you how to snap in times and out times to shot changes, so my intention is not to cover all the rules in this article, but rather to give you the basics if you are new to timing subtitles.
There is a window of time around shot changes that has specific rules. In the example below, you are seeing 24 frames from left to right. This window, in a video with a 24-frame rate, represents one second of your favorite movie. You can see 12 frames or half a second before the shot change and 12 frames or half a second after the shot change.

You cannot add in times or out times in the red zone. The size of the window and shot change rules can vary by client and also with time, when clients change their minds, but the window notion will remain unchanged.
Out Times That Land in the Red Window
If your subtitle lands in the red window and the audio ends…
1. Before the shot change: pull the out time to two frames before the shot change.
2. After the shot change: push the out time forward to frame 12. If this causes it to collide with the next subtitle, you will need to snap the out time back to the shot change (the blue box) and snap the in time of the following subtitle to the same shot change.

In Times that Land in the Red Window
If your subtitle lands in the red window and the audio starts…
1. 9 to 11 frames before the shot change: pull the in time back to 12 frames before the shot change.
2. 1 to 8 frames before the shot change: push the in time forward to the shot change (although I disagree with this tactic).
3. 1 to 11 frames after the shot change: pull the in time back to the shot change.

Can you guess why I disagree with the second tactic? We shouldn’t chop the audio on the in time! Correct! When client preferences allow me to break this rule, I do. If the subtitle does not collide with the previous one, I push the in time to 12 frames before the shot change.
These are my top ten principles of subtitle timing, but they’re not the only ones. There are dozens and dozens of them, and they all must be learned and followed by professional audiovisual translators who create files from scratch or conform them. My hope is that, instead of discovering them in their mistakes, like some of us veterans did, more and more subtitlers learn these principles before they start timing.

