by Adrián Bergonzi
A Little History: How I Discovered AutoHotkey
It was a long time ago. I had started working for a new subtitling agency and received my first assignment. Every new online system takes some time to get used to. Except this one, where the shortcuts were an absolute nightmare: Enter moved to the next subtitle, and Ctrl+Enter inserted a line break. One might think I’m exaggerating, right? After all, it’s just a shortcut. Well, no, we don’t have a switch at the back of our head, and let’s not forget that most of us work for several clients and some of them have their own subtitling platforms.
So, as this particular system did not allow me to customize the shortcuts, I did a little research on how to “change keys in Windows.” In no time, I had AutoHotkey installed and had written my first two macros. What I needed was simple: Enter must execute Ctrl+Enter (to insert a line break). I also needed another key to move to the next subtitle, which could be Tab or Page Down.
So, what is AutoHotkey? In the words of its developers, it’s “a free, open-source scripting language for Windows” which we can use to “define hotkeys for the mouse and keyboard, remap keys or buttons” and generate “autocorrect-like replacements.”
Let’s go back to our previous example and break down these two simple macros:


“Enter::” creates a macro on the Enter Key.
“sendinput” will send keys to the active window, where the cursor is. “Sendinput {Enter}” will press the Enter key. “Sendinput ^{Enter}” will send Ctrl+Enter. After each macro, don’t forget to write “Return”, which marks the end of each macro.
Beware that “sendinput enter” will actually write “enter”, not hit the Enter key. Also, to add a shortcut to the Enter key, we use “Enter::”, not “{Enter}::”. These are two very common mistakes that can frustrate beginners.
The “^” is a modifier used for the Control key. Other modifiers are “+” (Shift), “!” (Alt), and “#” (Windows key). Modifiers can be combined: “^+a” would press Ctrl+Shift+A. Keys can also be combined to create a macro; so, “^+!PgDn::” would create a macro on Ctrl+Shift+Alt+PageDown.
The lines that start with “;” (semicolon) are comments. You can write anything you want in a comment to help you remember what a macro does.
Rest assured we are not hacking or tampering with any online system. Macros reside and get executed on our computer.
The Tutorial
To learn how to install, create and execute scripts, I suggest you read the tutorial at https://www.autohotkey.com/docs/Tutorial.htm, specifically part 1, “The Basics.”
To get started, download and install AHK 1.1 (version 2 is still in beta). To create a new file, right-click on any folder and choose New > AutoHotkey Script. This will create a file that can be opened with any text editor, such as Notepad++. To execute the file, just double-click on it. Remember that one .ahk file can contain many macros.
Before attempting to write your own scripts, I strongly suggest you read the whole tutorial, as it will give you an idea of what AutoHotkey can do.
Using the Same Shortcuts Everywhere
Shall we adapt to the subtitling system or vice versa? If the system adapts to us, we’ll be more productive. In my case, I have designed a system of shortcuts that works for me in my favorite program (EZTitles), but nowadays most companies have their online subtitling systems. Some online platforms such as Ooona allow users to customize shortcuts, but when you can’t, we can use macros.
With AutoHotkey (AHK from now on), I can use the same keys for every company I work for. My play key is always “5” (numpad 5). It’s “5” because it’s in the center of the numeric keypad and because the key has a little ridge. “4” and “6” are one frame backward and forward. “1” and “3” jump back and forward (how many seconds depends on the system). “7” and “9” are the short jump back and forward. “2” and “8” speed down or up. “0” and “period” change the in-cue and out-cue of a subtitle. If you use a laptop without a numpad, you can always get a USB external numeric keypad.
So, let’s say a particular system has a shortcut to move one second forward with F2, but we need this to be on numpad 9, because it’s the key we are used to:

Now we need a shortcut to move three seconds forward with numpad 3, but the system doesn’t have a long jump forward shortcut to reassign. We can just create a macro and hit the short jump forward three times.

If there’s a number I don’t use, I turn it off. This is to avoid hitting it by accident and inserting digits into the text inadvertently. So, if a certain platform does not have a “Play 2X” function, I turn off the numpad 8 key. This creates an empty macro that does absolutely nothing.

Macros for Specific Applications
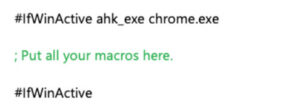
It wouldn’t be wise to lose the ability to enter numbers with the numeric keypad when we’re using Excel or any other application. So, to restrict our macros to work inside Google Chrome, we can use the following macro. Microsoft Edge users should use “msedge.exe” instead of “chrome.exe”.
Some Practical Examples
Up until now, we have only reassigned keys. Let’s see other examples that can come in handy.
Suppose that you’re QCing a subtitle file and the translator used lowercase for forced narratives. But the style guide for this client requires all FNs to be in UPPERCASE. This happened to a friend.
What could we do? Retype all the FNs? Of course not. Creating a macro that converts a subtitle to uppercase is as easy as ABC.
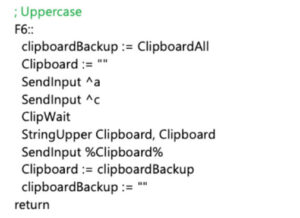
In this example, the macro is assigned to F6. First, we create a backup of the contents of the clipboard. We hit Ctrl+A (which selects all the text in the subtitle), Ctrl+C (which copies the text to the clipboard), and then convert the clipboard content to uppercase with the StringUpper command. Then we insert the new clipboard with SendInput and restore the previous clipboard.
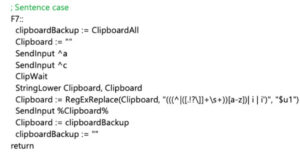
Converting to “Sentence case” is a bit more complex as AHK has no function to do this (it has StringLower, but we want sentences to start with uppercase). What we do is convert to lowercase and then capitalize the first letter of every sentence using a regular expression. Explaining regular expressions goes beyond the scope of this article, so here’s the macro:
Changing three periods to an ellipsis as you type, as is required by Netflix guidelines, is the easiest macro. It just requires one line:
![]()
Similarly, if François appears all the time in your show and you don’t have a Ç key, just type “francois” and let AHK replace it automatically with this macro:
![]()
Macros for SDH
For SDH, I found macros a must. I refuse to keep typing [Luis Fernando] and [Soraya] all the time, especially if a show has 150 episodes. In my case, I use a second keyboard just for macros.
It’s a cheap generic programmable keyboard (about 50 USD), designed to be used with a cash register. You don’t need an expensive Elgato Stream Deck, which is beautiful and looks cool, but is somewhat costly. There are several POS programmable keyboards, featuring from 50 to 84 keys, and probably more.
But you don’t need a second keyboard if you’re just starting out with macros. I’ll show you how you can program a menu to enter characters’ names just with two keys. One key brings up the menu, and another key types the character’s name. You could also create macros to insert common SDH tags, such as [grunts] or [gasps].
For this example, we’ll create a menu with three items. The first menu option will type “María” when you press number 1 (see macro below). “MenuCharacters” is the name of the menu we are creating. “&1” assigns 1 to that menu item, so that “María” will get inserted when you hit “1”. “InsertCharacterName” is the name of the function that gets executed.

Now, we assign a shortcut to bring up the menu. In this case, F8. “1200” and “600” are the menu coordinates (change them based on your needs). We can tell AHK to calculate the center of the screen, but I’m keeping it as simple as possible here. “MenuCharacters” must be the same name as before.

The last step is to create the function that will get called when a menu item is activated. In our example, it must be “InsertCharacterName”, as before. This function will type the character name between square brackets using “Sendinput”.
The previously-defined string to be inserted when number 1 is pressed was “&1 María”, so we use the function SubStr to omit the first three characters so that the text starts on the M.

And this is the menu we’ve created. Just press F8, then 1, 2, or 3, and you’ll get [María], [Luis Fernando], or [Soraya] in your subtitles. This will save you time and help you avoid typos such as [Lius Ferdinando}.
Controlling Video from Microsoft Word
A colleague once had this issue: She was proofreading a dubbing script in Microsoft Word to, and the video was on VLC. How could she control the video without leaving Word? The mouse was out of the question. You never touch the mouse. The mouse is lava. Hitting Alt+Tab a million times would be crazy, too. So, who you gonna call? The macros.
We could program a macro that would hit Alt+Tab, go to the player, press Spacebar in VLC (play), and hit Alt+Tab again to return to Word. This would work, but there’s a better way. Just send the command to the video player with “ControlSend”.
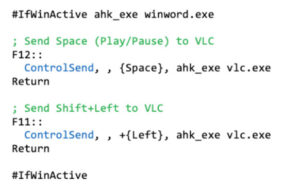
You can already guess what the previous two macros do. The first one sends the Space key to VLC when pressing F12 (so, it pauses and plays the video). The second one sends Shift+Left to VLC when pressing F11 (it jumps back the video three seconds). Both macros only work from Microsoft Word as they are between the “#IfWinActive” lines.
Why Use Macros?
What action needs a macro? If you find yourself hitting the same key or set of keys several times, that could be a macro.
Let’s say you have a subtitle that ends right where the audio ends, and you want to extend it exactly 12 frames (half a second for a 24-fps video), are you going to hit your shortcut 12 times to move the out-cue? No! You could create a macro.
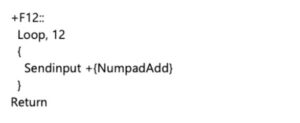
In this example, the macro is assigned to Shift+F12 (“+F12::”). The “Loop” command repeats an action, in this case, 12 times. The curly brackets are optional in this case, as there is only one line between them. This macro hits “Shift Numpad Plus” (with “+{NumpadAdd}”), which is the shortcut in EZTitles to move the out-cue one frame to the right. Of course, if you use a different shortcut, you should replace this line with your own.
Many More Things to Do
This is all the space we have for now. There are some other easy macros you can try to create yourself, for example, adding dialogue hyphens to both lines, or adding music symbols to the start and end of a subtitle (and even italicizing the text in between the music symbols).
The next time you start using a new subtitling system, instead of learning new shortcuts, you could use 30 minutes to prepare a new AHK file. It will save you a lot of time later.
Other macros will require doing some actual programming. Let’s say your system doesn’t have two basic functions such as “move word down/up”, which are used to change line breaks swiftly. This is doable, but beyond the extent of this introductory article. I hope you can start using macros soon and that they save you as much time as they do for me.
Adrián Bergonzi is an Argentine English<>Spanish translator and programmer. He has nine years of experience in audiovisual translation and software localization. He works as a freelance subtitle translator for major subtitle localization companies and has translated and proofread many films and series for theatrical release, Blu-ray and streaming. Contact: adrianbergonzi@gmail.com

